Hello Friends! I am SO SORRY! I posted the wrong link to Dawn Griffiths blog aka: Dawns Stamping Thoughts. There is another Dawn out there with the same title for her blog/website. There was a link to her site for the pop up Crab card and the plastic bag double slider, I fixed those links so they are now correct. I also changed the address in 'my favorite blogs'. If you notice any more incorrect links, please let me know! Thank you!!
Andi
Thursday, July 17, 2008
Saturday, July 12, 2008
Where have I gone???
Hello Friends! I thought I would pop in to let you all know I am way too busy with my family right now to stamp! Summer is here and so are all the kids!!! Plus extras like neices, nephews and lots of the kids friends!! We spend most of our time at the pond, pool, or parks!! 
 I am also still crazy with building our home! Here are some pics.

 I am also still crazy with building our home! Here are some pics.
I know this is a stampin' site, but thought you might like a peek! Have a great summer and I will be back in full swing in September!!
Thursday, June 19, 2008
Simple Thank You

Hello Friends!! Here is a simple Thank you I made for one of
my friends that placed an order with me. It is a 3 X 3. Those are a really fun size to make! I used the One of a Kind set by Stampin' Up! My color scheme is this weeks splitcoast color challenge. I should have tried the kraft....think I will tomorrow!!! I used Creamy Caramel, Soft Sky and Basic Black. The flower was actually stamped on Soft Sky with 1) Versa Mark pad 2) basic black. Then clear embossed. The flower in the center of the larger flower is from Boho Backgrounds by Stampin' Up! I thought it matched the tiny flower on the 'for you' stamp. The 'for you' image was punched out with the Window Word Punch. I used the Photo Corner punch in the corner of the note. The dots and the flower were colored in with Gel pens I picked up at Sams club. I am happy with them so far! They are Pilot G2 retractable gel ink rolling ball pen. 20 pens, assorted colors!! (just in case you wanted to know) I think that sums it up!
Happy Stampin'
Tuesday, June 17, 2008
Graduation card

Hello Friends! Here is a graduation card I made for a friend that is graduating! A simple card. White, Night of Navy and So Saffron were my colors. I first stamped the images in Versa Mark, then in the Night of navy. I then clear embossed them. The diploma and the caps were then colored in with the So Saffron Stampin' Write Marker, colored in with Versa Mark Marker, and clear embossed. I wanted to shine up the card and make sure it wasn't borring! I really like the books in the background. I highlighted them a bit and wrote '2008' on them. I am not sure about the circles I added with the '2008'. It needed something more, but, what???
Happy Stampin' Friends!!!
Andi
Monday, June 16, 2008
NEW RETIRED LIST IS AVAILABLE
Hello Friends!!! The Stampin' Up! Retired list is NOW available!! Check it out! Don't let those stamp sets you've been 'waiting' to order disappear! Contact me and place an order!
Happy Stampin' !!
Happy Stampin' !!
For my Sister's Birthday
Hello Friends! My sister's birthday is coming up in another week or so. Thought I better get on her card!! Can't wait til the last minute these days or it might not get done. I may not be home to do it!! We have been at the pond quite a lot lately!!
My sister likes horses, and green. (yes, so does my other sister that I made THIS and THIS for ) I didn't want to make it just like Heidi's stuff, so I went with Equestrian Dreams. I have to say. NEVER made a really nice card with this set. I really like the images, just haven't known quite what to do with it. I was really nervous. I liked Heidi's card so much, I felt like the bar was 'high'.
 I started with Vanilla card stock. Stamped the horses in Basic Brown. Then simply highlighted the running horses, and added a little more color to the row of them. A bit of Always Artichoke, Sahara Sand, Basic Grey, all water colored onto the image. Then I took my Versa Mark Marker and went over the images so I could clear emboss them both. That really sharpened up those images and made them 'pop'. Added so much to them!! I then brayered the sky onto the images. The embossing made it resist any ink that I brayered on. Perfect. After I got my images complete, it all came together easy. I could see that I was really liking this card. I roughed up some edges with my distress tool. Added some Chocolate Chip behind the images. Double matted the running horses with Always Artichoke. This was actually mainly because I wanted to faux stitch. I knew it wouldn't show up as good on the dark brown, so I added the green. I added some photo corners, thanks to my Photo Corner Punch. The greeting is from a retired set, and I added a build-a-brad in the middle of that. Yes, love those build-a-brad's!! The style of my greeting is a little different, but I wanted something small that wouldn't be the first thing to grab your eye.
Well, hope you like!! Happy Stampin' and thanks for visiting!!
Saturday, June 14, 2008
4th of July Invitations
Hello Friends!!! Wow, another card! Wish I could say I was back in the game, but I am not sure! There will be another post tomorrow, but after that, they will be more sporadic again :( Just SO busy! I hope you are all busy too and understand ;)
 Isn't this just the CUTEST invitation for a summer party! I found it HERE. I don't have a stamp that is small that says 'you're invited' like this Kristen, but I think it is still cute! Thanks Kristen for the awesome idea! It took like NO time at all!!! So easy and great to do with the decorative paper!!
 Happy Stampin' Friends!!
 Isn't this just the CUTEST invitation for a summer party! I found it HERE. I don't have a stamp that is small that says 'you're invited' like this Kristen, but I think it is still cute! Thanks Kristen for the awesome idea! It took like NO time at all!!! So easy and great to do with the decorative paper!!
The Strawberry is from Stampin' Up!'s retired DD Fruit Medley. I used the scallop punch for the 'bite', corner rounder for the other side, and a couple circle punches, 1 3/8" and 1 1/4". The inside is from SU! retired Dot Invitaion.
 Happy Stampin' Friends!!
Father in Laws Fathers Day Card
Hello Stampin' Friends!! LOOOOONG time no stamp? Sorry. I guess that is how it is going to be this summer. I will get to stampin' when I can. But the weather is HOT, the kids will be home.... lots of swimming to let them do, building a house, outside work. You know the drill!
SO! I finally stamped up my father in laws card. I was just brain dead. Couldn't figure out what stamp set to use. Wanted it to be one I thought he would like. I hope he likes the card. I think my mother in law will, and she will be the one that actually keeps it ;)

I used an old retired set, DD Pines by Stampin' Up! I THOUGHT I used a sketch challenge, but can't seem to find it. So did I make this sketch up! I swear I did not!!! The first step I did for this card is ink up those two large trees! I inked them in Versa Mark ink, then in Always Artichoke. I wanted to add texture, so BEFORE I stamped the trees, I then took the pine needle stamp, inked it in Basic Black, then stamped it directly on the rubber that is already inked with the Versa Mark and Artichoke. THEN I stamped it on the White Card stock!! I then clear embossed it. This is so I could create the sky and grass with out ruining the trees! I then positioned my circle cutter system and cut a partial circle, leaving the trees uncut so I could use my exacto knife and leave them 'out of the circle'. After the trees and the circle were cut, sponged a bit of So Saffron, then the Wild Wasabi Green for the grass. The sky is Soft Sky and Blue Bayou. I added a bit of grass with a Stampin' Mark marker and some flowers are just dots with the Brocade Blue Stampin' Write Marker. That piece is done. The diamond is Always Artichoke textured with the Cuttlebug embossing folder. I then placed that layering section on top of my white card stock so I could get an idea of where I wanted the bear to be positioned. I then inked up my bear in Versa Mark ink,Creamy Caramel on the face and feet, and Choco Chip on the body. I took the pine needles again and textured it with the Close to Cocoa ink. I added some black around the nose and edges of feet and back before FINALLY stamping him on the white!! Then I clear embossed him!!! Once he was embossed, I could brayer the sky and grass. Draw in some flowers. The geese were stamped in Basic Black, directly over the brayered sky. I used my white gel pen to added the white back to the geese. I guess the rest is just layering, gluing, and doodling!
Happy Stampin' guys!! Sorry I am not posting every day like before! I just have so much family life right now to attend too!!
Tuesday, June 3, 2008
Final Card for 3 card challenge
Hello! Here is the last of the 3 card challenge! Hope you have enjoyed them!
 My main stamp set is One of a Kind by Stampin' Up! I used the Prints Background stamp again for this one. I inked it in Pink Passion, then marked it up a bit with the Real Red. The flower was first stamped on Vanilla in Basic Black. Then I stamped it on Real Red, then on Pink Passion. I cut out the Flower and paper pieced it. The center was created with Build a Brad. (AGAIN!!) I did a bit of paper piercing around the edges and corners of the main image. Layered it with Real Red and then Pink Passion. Dotted a bit of Black around the edges. Gingham Ribbon was added. The I inked up the 'for you' with Versa Mark Pad, then used markers directly over the versa mark ink on the rubber so I could emboss the image in clear. I punched it out with the Key Tag punch then added some black doodles. That sums this card up!! Hope you like!!!
Happy Stampin'
Monday, June 2, 2008
Second of Three card challenge
Hello! Here is the second card for the challenge: Three cards, same stamp set, same colors. Must use hardware and ribbon. My stamp set is One of a Kind and my color scheme is Real Red and Pink Passion. All three of my cards also feature the 'Build a Brad'. I just bought them. They are great fun!! I love them in the middle of this great flower from One of a Kind.

For this card, I incorporated SCS Sketch Challenge SC178. The background for this card was created with a cuttlebug embossing folder. I do not own this GREAT TOOL, but my good friend Casey embossed a bunch of colors for me! Wow!! Thanks!!!
I used the punches Key Tag and Designer Label for this card. Just like my last one!! The large flower is stamped off the corner of the 'diamond'. I popped out he middle of the flower and added the build a brad. Hmmm. Pretty simple card. Gingham Ribbon again. White doodling. Black doodling. Lots of layers. I will admit. The inside of each of these layers is cut out. Saves paper and saves $ with the post if the card isn't too heavy. Hope you like!
Happy Stampin'
Saturday, May 31, 2008
Three in One Challenge 1 of 3
Hello! These next few posts are all part of one challenge! We were to create three cards. All using the same set, and the same colors. I liked this challenge. It was unique! I chose to combine some other challenges with this one. For my first card, I also did a sketch challenge.

My color scheme for these cards is Real Red and Pink Passion. These colors came from the inspiration from Sandy's card in a previous post. My stamp set is One of a Kind by Stampin' Up! The background stamp is Print Pattern by Stampin' Up!. I inked that large stamp in Pink Passion and then stamped the smaller flowers scattered about in Real Red. I added a bit of Dazzling Diamonds glitter to the centers of them.
I stamped the main flower image in Basic Black and water colored with Pink Passion. The Red is colored in solid with Real Red Stampin' Write Marker. The full flower is embossed using the versa mark marker and clear powder. I LOVE this technique. Makes your image really pop. In the center of the flower I used 'Build a Brad'. Pretty cool. I just got these for the first time. I am really happy with them! What fun! I used them in all three cards! I backed up this main flower with Black and distressed the edges with my distressed tool. I also paper pierced all around the square.
For punches, I used the Designer Label punch and the Key Tag punch. The ribbon is the black and white gingham. I love this ribbon. It is super easy to work with. Not stiff at all. I added a brad from the pewter Hodgepodge Hardware set. Some white doodling all around, and I am done! Do you like!?! I had so much fun with these colors!
Happy Stampin'
A simple card

Hello! gosh, I really hope I haven't posted this card before! I haven't been stamping since I am so busy. I thought I would post a few I made already! If it rains today, I will stamp....hope my kids aren't bouncing off the walls. They usually do when it rains!
This is a 3X3 note card. Very simple. I think it is very cute. I used Pretty in Pink and Chocolate Chip for my color scheme. I water colored some of the images. Added GLITTER, BLING, PAPER PIERCING and RIBBON. Those are the elements that make this card seem so special! This was not time consuming, anyone can do it. All those elements just really set off a card! If you don't have the mat pack and paper piercer, GET THEM ;) and get the bling!! get the glitter!!! Add a few of these things and your creation will look GREAT!!!
Happy Stampin' Friends!! Have a GREAT weekend! Hope we can all stamp!!
another oldie, but goodie

Hello! So here is another 'oldie, but goodie'. I really like this card. I love the color combo! I have to say though, I made this awhile back. I am not sure the layout is my own. So no full credit for this one!!
I used the set All About U by Stampin' Up!. My color scheme is So Saffron and Real Red. The background was created with the background stamp, Canvas and then I stamped the small flower right on top of that. I used glossy card stock for the 'U'. I like the bold look it creates with those solid stamps!! I used the slot punch to create a little card onto of the card! Just a little added fun. I also used the slot punch to hold the red gingham ribbon in place.
This is a very simple card! But you gotta have those too!!
Happy Stampin'
Friday, May 30, 2008
A card to CASE
Hello! Sorry I haven't had much time for myself lately. Not a lot of stamping time ;(
I thought however it might be nice to share with you a card that was sent to me a while back. One of my fav's!!  My dear friend Sandy is such a wonderful Card Creater! She made this for me for Valentines Day. Not sure what year.... ha ha! It is an oldie, but goodie! I basically 'cased' this card and created an Easter Card with it. I created my card a couple years ago too. So no new 'hot' stuff! I think I will now have to stamp a card using those wild colors! I love the Real Red and Pink Passion together! Sandy's card is 'HOT HOT HOT'
 My dear friend Sandy is such a wonderful Card Creater! She made this for me for Valentines Day. Not sure what year.... ha ha! It is an oldie, but goodie! I basically 'cased' this card and created an Easter Card with it. I created my card a couple years ago too. So no new 'hot' stuff! I think I will now have to stamp a card using those wild colors! I love the Real Red and Pink Passion together! Sandy's card is 'HOT HOT HOT'
 For my card, I used Bliss Blue and Lavendar Lace. The stamp set is the retired set Spring Things. It is a real cute layout. Hope you like, and thanks for hangin in there with me. I am so busy with Kids, potty training, building a house, and 'spring things' !!
 Happy Stampin' All!
Wednesday, May 28, 2008
busy busy busy
 Hello! I can't believe this stamped image isn't SU! Hee Hee. I have had this image since before I was a demo, so like what, 11 yrs or so? One of my fav's. I don't use it much, well, haven't used in probably 10yrs, but I just like looking at it up on my shelf. I can totally relate to the image...I think you can all see that. Only one problem. This is me, right?? Ok. But where am I? There are no kids on top of me, and aside from being almost passed out, there are no toys or clutter anywhere!!!!
I decided to do my first Mojo Monday sketch. Pretty cool sketch! I really like all the different elements on this one!
I also took the SplitcoastStampers Color Challenge, CC168, Vanilla, Sage, and Choco Chip. Really no challenge. Quite easy to work with! I had those cool colors in the DSP Outlaw. I thought the stripes would look good on the chair. The stamped image was actually stamped three times. Once on the vanilla, once on the striped paper and then once on the white. The only part I kept off the white paper is the 'don't ask'. It really 'pops' that way.
I added a bunch of details to this card while still keeping it very clean. No brayering. I added paper piercing all over. Some was used for faux stitching, some was actually pierced on the reverse side of the paper. For example: I actually placed the striped piece of paper, stripe side down onto my Mat Pack. Then poked the holes. I love the look. Basically, had I done it stripes up, you really wouldn't have seen the holes. The paper is too busy. Sometimes the paper is just too dark too. Reversing it gives more definition and you can actually see white around the holes, a natural highlight, if you will!! The holes around the circle punch are reversed too.
I added some corners with my Photo Corner Punch, got into my Hodgepodge hardware and added some hardware and ribbon. I think that sums it up!
Hope this makes you smile ;)
Happy Stampin'
Andi
Monday, May 26, 2008
My Fathers Day card
 Hello! Here is my Fathers Day card. I need to make one for my father in law yet, but I think my dad will appreciate this one. He likes details. And I added a LOT of details onto this card! The tree is from Lovely as a Tree by Stampin Up! It is STILL available! This set has been around a long time. I stamped the tree in Basic Brown. This is a waterproof ink. I was able to then watercolor right on top of the brown. I added some Stampin' Write Marker, Gable Green directly on the tree. Just in spots. Then I added some Wild Wasabi with my Aqua Painter and tried to blend in the greens. I then added bits of Always Artichoke for more depth. Finally I added some flowers. Hey, it is spring and everything is in bloom here!!! The trunk was water colored with Creamy Caramel and then highlighted with Close to Cocoa Stampin' Write marker. I added some fallen blossoms onto the ground directly under the tree and water colored a bit of Wild Wasabi too. I then colored the entire image with the Versa Mark Marker and clear embossed the tree. After that, I brayered some Soft Sky into the sky. A bit of Tempting Turquoise was sponged in too. For the grass, I sponged Gable Green and Wild Wasabi. A few flowers and stems were drawn in. I used Pink Passion for all the pink flowers, I also added some Lavender Lace dots for another flower. This 'treatment' was also used for the background I created. Brayering, Sponging and drawing in stems & flowers with the Stampin' Write Marker small tip. The 'happy father day' was created with the Everyday Flexible Phrases, 2004 by Stampin' Up! This is retired.
I matted the card with Close to Cocoa and Always Artichoke. No ribbon on this card since it is for my dad. No scallops. Just some 'tough' Hodgepodge hardware!!
PS: Potty training is going better today. Praise the Lord! Q finally even went on the potty with out my asking him if he has to go potty! Whew. By golly, I think he is gunna get it after all. Not TOOOO many more grey hairs on my head ;).... make that TWICE he has gone all on his own! He just did it again! Yah, he gets a treat for that!
happy stampin' all, and happy life!!
Sunday, May 25, 2008
Wish I was at that beach!

Hello! This card was a Featured Stamper Challenge from Splicoatstampers. The featured stamper is Peanutbee. I chose a card she created, changed a couple things: I changed the stamp set, ribbon, added some punches, added some paper piercing, and created my own background. It is a lot of fun, pretty easy when someone else chooses the stamp image and colors! My stamp I used wasn't exact, but I stuck to the same idea, a beach scene.
My colors are Mellow Moss, So Saffron, Soft Sky (for the sky), Ballet Blue (sky again), Creamy Caramel and Close to Cocoa for the sand and weeds. After I colored in the girl, I embossed her with the Versa Mark Pen. Then I brayered the sky and sand. I used the Ticket Punch and punched out the top corners of the square with the girl. The 'make a wish' came from A Little Birthday Cheer set from Stampin' Up!. FYI, my wish is to be there, on the beach!!! I used the Designer Label punch and Key Tag punch for the greeting. Added some Paper Piercing there. The ribbon is DSR, Blue Bayou. The weeds were drawn in with Stampin' Write Marker, Close to Cocoa. The dots for sand are actually 'feed' from Best of Cluck set.
Saturday, May 24, 2008
Get Well
 Hello Friends! My Aunt has been stampin' up a storm! She got to me tonight and inspired me! I thought I would check out Splitcoast Stampers and find out what the color challenge was for this week. CC167, Certainly Celery, Blue Bayou and Soft Sky. I thought I would do Beate's Weekend Sketch challenge too.
 So for this card, Soft Sky is on top, Blue Bayou on the bottom, and Certainly Celery is used in the scalloped oval, and water colored onto the whale. The Whale is from Pun Fun by Stampin' Up!. I wrote the 'feeling green' and then punched it out with the 1" circle punch. I backed it up with the 1 1/4" circle punch and 1 3/8" circle punch. The double stitched ribbon is Soft Sky and Blue Bayou. I punched out 'get whale soon' with the window word punch and added two brads to dress it up. There is a bunch of paper piercing and white doodling.
I guess that is it! Pretty simple card. Fun to make!!
Happy Stampin'
Thursday, May 22, 2008
Instructions for Pocket Fold Card
Hello! Here are some instructions for the Pocket Fold Card. I hope they are easy for you to understand!!
I first made a template of this card since it has the rounded top. For this I used the white board that came in the packaging with the Designer Series Paper. I am not showing that on these photo's I took for this tutorial. Sorry, the white board wouldn't show up good, so I am showing it with the actually DSP.
You will need:
8 1/2" X 8" Designer Series Paper (Base of card)
A dish plate for a round template
Scoring tool
- First cut your paper to size.
- 8 1/2" is the width of your card
- score @ 1 1/2" and 7"
- Flip card and then score @ 2" (flip back again so you are ready for next step
 Place plate at top of card, center, and trace ( - again 8 1/2" is the width, 8" is the height)
- cut out so your top of the card is rounded
- cut out the rectangles at the bottom corners.
- use your bone folder and fold in sides, then fold up bottom of card


The base is now ready! Time for you to create your card!
Happy Stampin'
A couple more pocket fold cards
Hello! Here are a couple more of those pocket fold cards! They are such a great way to use and show off that wonderful double sided paper! And SOOO easy! Just by using different paper you can create a totally different look, as shown in my western mother's day card.
The this card I used the Porcelain Prints DSP. I stamped the flower from Heartfelt and then punched it out using the Key Tag Punch. I paper pierced all around the tag, punched the Horizontal Slot and then added the Blue Bayou DSR. The inside 'note' card has a Jumbo eyelet attached to the 1 3/8"circle and 1 1/4" circle punches.
 For this Pocket Fold Card, I used the Le Jardin DSP. The greeting is from Sweet Serendipity, inked and stamped in Always Artichoke and then punched out with the Key Tag punch. I paper pierced a little on this to show dimension since I stamped and punched on the same background paper as the card. I used River Rock DSR on the top of the 'note'. The bird was punched out with the 1 1/4" circle punch right from the DSP. Then bordered with Bashful Blue with the 1 3/8" circle punch. I then punched a scallop with the Scallop punch out of Vanilla Cardstock.
Hmmm. Just got an idea for another one of these Pocket Fold cards! Better get to work!
Happy Stampin'
Tuesday, May 20, 2008
Just Moved....well, gunna...
 Ok, what is this set NOT good for??? Do you not just LoVe LOADS of LOVE by Stampin' Up!! I got the idea to add part of the truck in the back for a trailer from someone on Splitcoaststampers a while back. Can't remember who, but it stuck in my head. I had to add an extra yet. And count all the kids!!! I think this card turned out totally cute with all the children peeking out around the packed up stuff! We aren't moving for a couple months yet, but thought I would play around with an idea or two. This one is adorable, but took a lot of time. A lot of cutting out. Fine for a card, but for many more?? Hmmm. Not so sure about that. I stamped the truck on Buckaroo Blue three times, three times on white too for the bumpers. Stamped the girl out twice, the boy out 6 times! Three sets of furnishings. The family and furnishings were colored in with markers, and of cut out. ( now that I have the layout, if I were to make more of these, I think I could just stamp directly on the sketch and then mask over the kids or what ever image is in front) I punched out the wheels out of black paper with the 3/4 " circle punch. The insides of the wheels were punched out of the Buckaroo Blue. I had colored them in with white gel pen first. Dots were added to the truck with the Gel Pen too. The sky was brayered with Soft Sky and then Buckaroo Blue. The road is Creamy Caramel. I added doodling with Chocolate Chip on the road, and Brocade Blue around the top of the sky. The background paper is from the retired SSK Travel Time. I think this background paper is perfect. You can't see from the front, but the back of the card is full of route signs from a highway. Sure, we are moving just 3 miles away, but still! It is cute!! And it is a HUGE move for us! Very exciting.
Anyway! This was todays creation. Yesterdays wasn't so hot. I won't be posting that!! Hope you all like this one!
Happy Stampin'
Monday, May 19, 2008
Birthday card

Hello Friends! Here is yet another peek-a-boo card! The inside image is a cow. A lot was done to this card! I started off with Yo Yo Yellow! WOW is that bright! I am not really a bold brights person. As I am sure you can see if you check out my blog much! It is good to get out there and try things though, so Yo Yo Yellow it was. I thought that color would work good with Stampin' Up!'s retired On the Farm set. I made this card for a girl whose birthday is coming up and we bought her a webkinz pig. So this card is perfect for her!
The barn was stamped twice. I first colored and embossed the full barn, and the extra barn door and silo cap. Then I popped out the barn doors and the silo cap. My color scheme is Real Red (barn and bandana), Going Grey (roof), Bordering Blue (silo), Brilliant Blue (farmers shirt), and of course the Yo Yo for his over-all's and the hay. The background was created by brayering with Soft Sky, Ballet Blue and a touch of Brilliant Blue with a sponge. The grass is Wild Wasabi. I then layered the focal point with Real Red and Glorious Green. Added the embossed Farmer. Added some doodles, a Window Word Punch with a piece of Red Gingham and done. The bit on top was really needed. There was just too much bright yellow on top of the card.
I hope you like!!
Happy Stampin'
Saturday, May 17, 2008
Grid Technique
Hello Friends!! I thought I would try the scored background AKA 'grid technique' for this card. It turned out kind of cool. I used my Score-Pal for the background behind the trees. I scored lines going one way, flipped the piece of paper, then scored some more lines! Check out the tutorial on Splitcoaststampers if you do not understand what I am saying!! My stamp sets I used are A little Birthday Cheer and Lovely as a Tree by Stampin' Up!

I also went with a Color Challenge, CC166 Ruby Red, Soft Sky and Pumpkin Pie. I guess the colors are ok. Kind of fall like. So I think I will save this card for a fall birthday. I didn't think the colors stood out enough in the trees, so I added little Pumpkin Pie and Ruby Red dots with my Stampin' Write Markers. I also used my Paper Piercer, Mat Pack and Chocolate Chip Stampin' Write Marker to create a faux stitch. I think that turned out cool! Even in person it looks like I stitched it. You really need the mat pack for that!!
I think I discovered something really cool today! Ok, so you may all already know this and do this....but pretend you don't!! I was trying to figure out how I wanted the ribbon placed. I knew I was going to use the Stapler. I didn't really want the ribbon hangin' off the edge. So I got the bright idea to lay the ribbon out flat, staple it, THEN tie it in a knot. It is attached and ready to go that way, no glue for these knots! I love this!!

For punches, I used the 1" circle punch and the window word punch. The greeting 'celebrate u' came from A little Birthday Cheer. The stamp actually is 'celebrate you', but it wouldn't fit inside the window word punch, so I took out the 'y & o'.
I guess that is it! Happy Stampin'!
Friday, May 16, 2008
On Board Book Basics for Mother in Law
Hello Friends!! Here is the gift I never posted for my mother in law! We just had a colt, so I thought I would wait to add some more photo's. I am sure there will be lots with the kids and the baby horse!


I used the On Board Book Basics by Stampin' Up! They are on special this month!! May 2008, purchase $35 worth of goodies from our catalog and you can purchase as much On Board products as you want for 25% off!! Don't miss out on this deal! I love how all the On Board Book Basics gifts turned out for Mother's Day! My mom's gifts were posted earlier if you want to go back and check them out!
For this project, I used the retired paper's SSK Round Up and DSP Outlaw. LOTS of punches and LOTS of paper piercing!!
Happy Stampin' or Scrappin' what ever you are doin'!!
Thursday, May 15, 2008
Photo Wallet for my sister
Hello Friends!! Here is a really simple and quick gift idea! A photo wallet!

For this project, I used my textured 12X12" card stock. You need 4 1/4" X 11" for the wallet base. I scored my wallet @ 3", 3 1/4", 7 1/4" and 7 1/2".  For the inside, 4 X 12 scored @ 4" and 8". I added more paper to add onto the length. I think you don't have to. Especially if you put photo's on both sides. I used the DSP Outlaw and the SSK Round Up, both by Stampin' Up!
 For the inside, 4 X 12 scored @ 4" and 8". I added more paper to add onto the length. I think you don't have to. Especially if you put photo's on both sides. I used the DSP Outlaw and the SSK Round Up, both by Stampin' Up!
I used the scallop punch with a jumbo eyelet for a closure. The hemp is just wrapped around the wallet, then wrapped under the eyelet. Holds it perfect.
Happy Stampin'!
Wednesday, May 14, 2008
Peek-a-boo for my sister's birthday
Hello Friends!! I made a card this morning for my sister's birthday. Her fav color is green, so I started with that! I love the textured paper. I decided to go with Wild Wasabi, textured. Next I decided to create a peek-a-boo card. And FINALLY I decided on my stamp set! I went with Crab & Company by Stampin' Up! because she is down in FL, with those nice beaches!!


My color scheme is Groovy Guava, Wild Wasabi, and Whisper White.
I stamped the crab three times. This is so I could pop out his little body and claws. (I ended up only popping him twice though)

His entire body was embossed using the Versa Mark Marker. Check out the tutorial on that for directions ;) This is so I could emboss resist. I then brayered the sky and sand with out messing up the color job I did on the crab! For the sky I used Soft Sky and Tempting Turquise. The sand is So Saffron and Creamy Caramel.
 This is so I could emboss resist. I then brayered the sky and sand with out messing up the color job I did on the crab! For the sky I used Soft Sky and Tempting Turquise. The sand is So Saffron and Creamy Caramel.
His extra claw and body were embossed too. I think it looks sharp that way! I cut out the extra body and claws, and used pop dots to adhere them directly over the 'main' body. The gift, hat and cake were embossed with the versa mark marker too.
I used my White Craft ink for the backgrounds with the shell and the star fish. Lots of doodles with my White Gel pen.
On the inside I used the punches: Designer Label, Key Tag and 1 3/8" circle punch. You will also need the 1 1/4" circle punch for the 'peek-a-boo' card. Check out the tutorial on this card to discover how to create it!
Happy Stampin'!
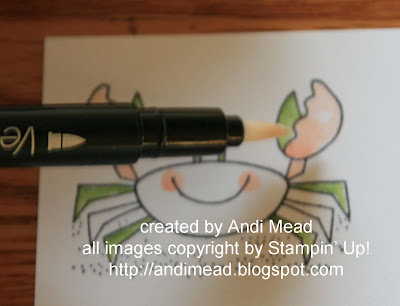
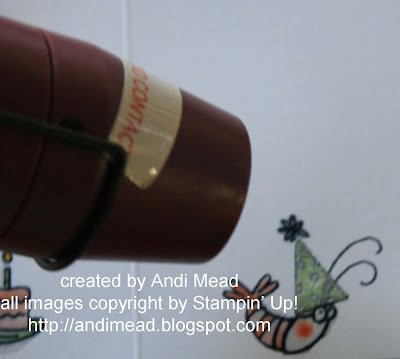
tutorial on emboss resist
Hello! This is a way you can emboss resist. 

- stamp your image you want to be 'on top'. Color it in. Color in again with Versa Mark Marker. Sprinkle Clear embossing power over it and then use heat gun to emboss!
 Stamp image you want 'under' right on top of the embossed image.
 - Wipe away any ink left on 'top' image

TIP: I stamped a little too quick. My embossed image wasn't quite cool. I accidentally smeared the ink a bit. You can't tell after I colored in the image though!!
Now you try!!
Tutorial on Embossing Colored in images
Hello! This is how you emboss images you have colored in!
 1st: Use your Versa Mark Marker and color in image (after you have colored it in already with marker, crayon, pencil, whatever...)
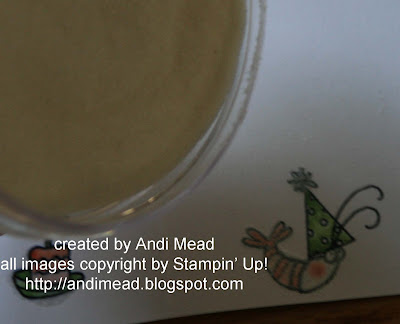 2nd: sprinkle CLEAR embossing powder over Versa Marked image
 3rd: Heat powder until all shiny with a heat gun
That is it!!
Tip: For larger images, I emboss parts at a time. For example, I embossed the shrimp body, then went back and embossed the hat!
Tuesday, May 13, 2008
For GG and Pop
 Hello Friends! So sorry the lighting wasn't quite right on this one. I made this card for my grandparents in FL. I use to make my Grandpa Snicker Doodle's when I was little. Now, he is much older (of course) and not doing so well. I thought he might like some cookies. This is the card to go along with them ;) I used Crab & Company by Stampin' Up!
My color scheme again, was SCS challenge, Certainly Celery, Lovely Lilac, and Pretty in Pink. I used the Prints DSP Certainly Celery for the Crab's body and part of the claws. Very Simple card. I relied on the little extra touches to really set this card off. Lots of paper piercing, lots of doodling (sorry you can't see it very well - I doodled all around the card with Pretty in Pink marker, and along the Key Tag too) I also used the white gel pen for some doodles! The scallop edge was created with the slit punch, check out my tutorial on that if you do not know how to create that yet. I added Pretty in Pink 1/4" Grosgrain Ribbon, and a couple Lovely Lilac eyelets. I see the lilac eyelets are discontinued, but you could add rhinestone brads instead, and they would look nice!
Happy Stampin'!
Monday, May 12, 2008
Heartfelt
 Is Heartfelt Thanks not just one of the most beautiful sets by Stampin' Up? This is a very simple card, you need those!!! My color scheme is Orchid, Brocade Blue, and Wild Wasabi. I used the Misting Markers technique. (color your solid image with markers, then hold your stamp away from you about 12", rubber facing you, mist water at it 1 to 2 times, then stamp!)
For punches I used the Photo Corner punch, 1 1/4" circle punch, and Scallop Punch. The scallops were created with my slot punch. Check out the tutorial I created for my blog for instructions on that.
I used my Paper Piercer and Mat Pack for added details, along with a little doodling with my gel pen. Hope you like!
Happy Stampin'
Andi
Sunday, May 11, 2008
My Mother's Day cards
Hello! Here are my mom's Mother's Day cards! They were such simple cards to create, and I LOVE the use of the double sided DSP!!
Check out the directions for this card!
 For my Mom's card, I used a retired piece of paper. Stampin' Up! has the same pattern in their current catalog, only it is called Azure (it is blue obviously!!) Gorgeous paper!! The stamps I used for this card are Sweet Serendipity and Happy Mother's Day is from an All Year Cheer set I bought YEARS ago. Not sure of the date on that one! I apologize, I didn't' put it away correctly and can't seem to find it or, I would let you know the date on the stamp!
The punches I used for this card are the 3/4" circle ( for the faux scallop), the Key Tag punch, Designer Label and the Scallop Punch.
I added some gingham ribbon, some bling, and then that was it!
 For my Mother in Laws, I used the Outlaw DSP (retired, check out the Western Sky DSP, just as cool), and I used the retired SSK Round Up.
I added brads across the inside layer of the card, and a jumbo eyelet in the center of the star. Some hemp really 'tied' this card off! I stamped "wonderful friend" on the inside (you can just see it) from Boho Backgrounds.
Happy Stampin' Friends!
Saturday, May 10, 2008
bugs and kisses for my niece
 Hello Friends! This is an adorable stamp set. I haven't used Bugs & Kisses in forever!! I picked it out because of the solid images. The grass hopper was stamped three times. First for the base, second for the body, third just for the head. All three layers were layered directly on top of each other with pop dots for dimension. My color scheme was a SCS challenge: Certainly Celery, Pretty in Pink, and Lovely Lilac. A lot of unches were used here: Photo Corner, Window Word, 1 1/4" circle, Designer Label, Key Tag, and I used the corner rounder for the scallops.
I used the Jumbo Wheel Daisy Dash for the background. The insides of the flowers were colored in with my white gel pen.
Hope you like my cute girly card. I thought my niece would like to get some mail this week, so this one is for her ;)
Happy Stampin'
Andi
Subscribe to:
Posts (Atom)


